大家好,
今天來分享一下我使用 Hexo 建立這個 blog 的過程。我知道 Hexo 很久了,但今天才下定決心使用 Hexo 來建立我的個人 blog,主要也是希望這樣可以逼迫自己好好的紀錄從碩士時期開始到現在亂點技能樹的歷程 XD
建立環境
基本需求
安裝 Hexo
1 | $ npm install -g hexo-cli |
設置
當環境安裝完成後,選擇你要作為 Hexo 的目錄。本文以C:\Users\User\Desktop\hexo_website為例。
1 | $ hexo init C:\Users\User\Desktop\hexo_website |
執行完畢後,C:\Users\User\Desktop\hexo_website內的結構應如下:
1 | . |
設定檔
主要會更改的有以下兩個:
- _config.yml
- _config.{theme_name}.yml
- 本文為:_config.next.yml
使用 NexT theme
安裝 NexT
確保 cmd 路徑在 C:\Users\User\Desktop\hexo_website 後執行以下指令。
1 | $ npm install hexo-theme-next |
或是可以直接 git clone,本文是使用 npm 進行安裝。
1 | $ cd hexo-site |
確認資料夾最外層是否有 _config.next.yml。如果沒有的話可直接將 /themes/next/_config.yml 複製出來並更名為 _config.next.yml。
進入 _config.yml,並更改以下參數:
1 | theme: next |
常用指令
新增
輸入以下指令會根據 /scaffolds/post.md 模板建立一個 /source/_posts/{title}.md 文件供撰寫新的文章
1 | $ hexo new post {title} |
輸入以下指令會根據 /scaffolds/page.md 模板建立一個 /source/{page name}/index.md 文件供撰寫新的頁面
1 | $ hexo new page {page name} |
clean 清除靜態檔案與快取
1 | $ hexo clean |
generate 產生靜態檔案
1 | $ hexo generate |
server 啟動伺服器
可在 local 端建立 Hexo 伺服器,預設為:http://localhost:4000/
1 | $ hexo server |
deploy 部署
可直接透過 git 部署到 GitHub Page
1 | $ hexo deploy |
部署到 GitHub Pages
建立 Repo
首先,先建立 GitHub Repo:{username}.github.io。
恩…這邊好像也沒啥好說的XD
上傳!
Git 安裝
回到 Hexo 資料夾,下載 Hexo 的 Git 套件
1 | $ npm install hexo-deployer-git --save |
修改 _config.yml 的設定
修改 _config.yml 有關 deploy 的設定參數。
1 | deploy: |
輸入指令啦
1 | $ hexo cl |
這樣就完成啦~ 在 Repo 裡面會顯示更新的圖示,等到 deploy finish 就可以到自己的網址中看看成果了!
Sitemap
我淺顯的理解:
- Sitemap 是用來描述網頁的架構,主要是用來讓搜尋引擎的爬蟲找的到網頁用的
回到 Hexo 資料夾,下載 Hexo 建立 sitemap 套件
1 | $ npm install hexo-generator-sitemap --save |
接著進入 _config.yml 修改以下參數
1 | # URL |
再重新 generator 後會看到 sitemap.xml 就搞定了!
Google Search Console
到 Google Search Console 進行 sitemap 的驗證和提交。
在右側的「網址前置字元」輸入你的 URL。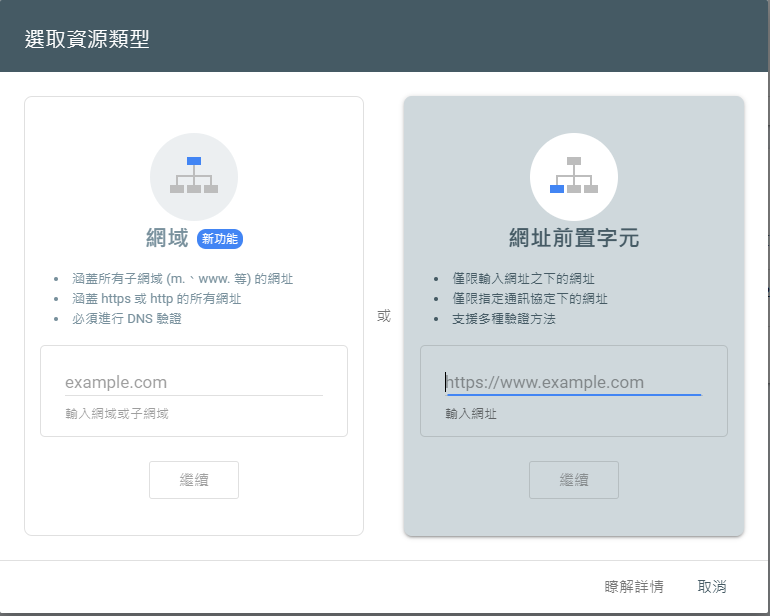
下載圖中的 .html 並放置在 /source/google{parameter}.html
接著,重新執行!
1 | $ hexo g |
成功部署後,回到 Google Search Console 按下驗證啦!
驗證成功後就可以等待一兩天,等 Google 的小猴子來訪後,就可以直接 Google search 到你的網頁啦~
結語
今天裡面對於 NexT 主題的各種更動並沒有記錄在內,這裡也有很多細節是需要注意的,但或許之後找時間再來慢慢分享。今天就主要 focus 在讓這個網頁可以順利啟動吧!